-
Product Management
Software Testing
Technology Consulting
-
Multi-Vendor Marketplace
Online StoreCreate an online store with unique design and features at minimal cost using our MarketAge solutionCustom MarketplaceGet a unique, scalable, and cost-effective online marketplace with minimum time to marketTelemedicine SoftwareGet a cost-efficient, HIPAA-compliant telemedicine solution tailored to your facility's requirementsChat AppGet a customizable chat solution to connect users across multiple apps and platformsCustom Booking SystemImprove your business operations and expand to new markets with our appointment booking solutionVideo ConferencingAdjust our video conferencing solution for your business needsFor EnterpriseScale, automate, and improve business processes in your enterprise with our custom software solutionsFor StartupsTurn your startup ideas into viable, value-driven, and commercially successful software solutions -
-
- Case Studies
- Blog
A Detailed Tutorial on How to Build an API App Based on GraphQL and Trailblazer: Part 1
What’s the quickest way to learn cool new technologies like GraphQL? By following a detailed but simple tutorial and creating your own application. With this idea in mind – and our desire to share knowledge with you – we’ve created a tutorial you can use to build your own app based on GraphQL and Trailblazer. Stay with us if you want to learn how to use these tools in your projects. But first, a little bit of theory.
Main terms
Here are the main terms we’re going to use in this tutorial:
- GraphQL – A query language for getting data and declaring its structure. This technology is used as an additional layer between a client and a server. One of the main features of GraphQL is that the data structure is determined by the client app.
- Query – The part of the GraphQL schema responsible for reading data
- Mutation – The part of the GraphQL schema responsible for modifying data
- GraphQL schema – The center of any GraphQL server implementation; it describes the functionality available to clients that connect to it
- Type – The form of all elements that compose a schema
- Resolver – Instructions for calculating values of a field in a schema
- Trailblazer – A gem for creating a high-level architecture in an application. The Trailblazer gem stores all business logic in operations. Controllers contain only HTTP-specific logic. Models contain only associations, enums, and scopes.
Why do we need a GraphQL and Trailblazer combination?
We chose these technologies because they work perfectly together. Each of them has a long list of benefits:
GraphQL benefits:
- A client can choose what data it needs.
- You can use one query to get different data. With REST, you would have to use several queries.
- You don’t need to write documentation for APIs, as the schema is a sort of documentation itself.
- There’s no need for version control.
Trailblazer benefits:
- All business logic is in a separate architectural layer.
- Trailblazer provides an API that allows you to structure your business code into steps.
- Clean models
- Clean controllers
GraphQL and Trailblazer help you organize your API as flexibly as possible in terms of displaying data based on requests from client applications and, at the same time, make it scalable from the business point of view.
Building an API application based on GraphQL
The task
The application we’re going to build is an API with minimal to-do list functionality. We’ll build it with a GraphQL server based on the Trailblazer architecture that will later serve as a template for building more complex applications.
Technology stack
The main technology we’ll be using for our application is Ruby 2.5.1 and Ruby on Rails 5.2.1. We’ll also use Trailblazer 2.1.0.rc1 and GraphQL 1.8.11.
Step-by-step tutorial
1. Project setup
Create a new API application:
Let’s run it with the command rails s and make sure that our app works. To check that it works, follow this link: http://localhost:3000/
The next step is to configure the .gitignore file:
The next step is to set up the test environment. Let’s add the necessary gems to the Gemfile:
And install rspec.
After that, configure rails_helper.rb:
1.1. Configure Trailblazer
Now it’s time to configure Trailblazer and add the necessary gems:
Create trailblazer.rb in config/initializers:
To use such methods as form, present, run, and respond in controllers, we need to amend application controller.rb:
1.2. Configure GraphQL
Now we need to configure GraphQL. First, let’s add the necessary gems to the Gemfile:
The graphql gem is a tool that opens all opportunities of GraphQL. The graphiql-rails gem mounts the GraphQL IDE in Ruby on Rails applications.
Install GraphQL:
After installation, we get the following files:

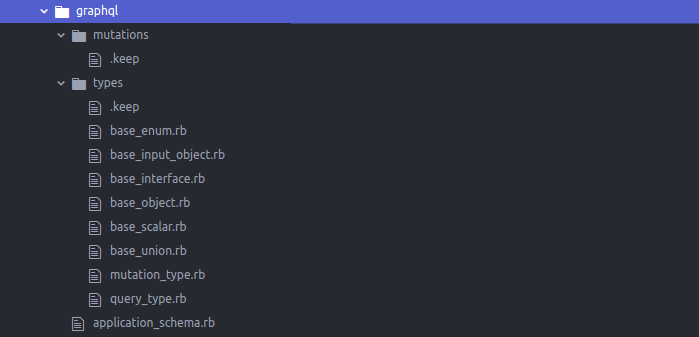
The file structure that the gem offers isn’t very convenient because all GraphQL elements are placed in one folder. We suggest moving the main elements (mutations and queries) to the root GraphQL folder and other elements to the lib subfolder. Let’s use the following structure for the graphql folder:

During installation of graphql, a controller was generated. This controller is an entry point for GraphQL:
Let’s make this controller RESTful and move the logic to Trailblazer concept
The Graphql::Execute operation looks like this:
We’ll also move the logic for validating the variables parameter to a service object:
At this point, we’ve finished configuring GraphQL.
2. User features
2.1. Signup feature
First, we need to implement the signup feature. For that, we need to create a User model.
2.1.1. Implement an operation
It’s time to create the Users::Create operation. This operation should create a User and validate input data: an input can’t be empty, a password can’t be fewer than six symbols, the password chosen has to match the one in the confirmation field, and the email has to be unique.
Let’s start with tests for this operation:
Now we need to implement the operation itself:
Here’s what’s happening in the concept step by step:
- An object of the User class is initialized and saved to the variable ctx[‘model’] with the help of Model macros.
- The Users::Contract::Create contract is initialized (creating a form object).
- Input parameters are parsed and validated with the contract.
- Form data is mapped to the model and saved.
Here’s what the contract looks like:
The contract consists of two parts:
- Description of input parameters
- Parameter validation with dry-validation
2.1.2. Implement a GraphQL mutation
First, let’s write a test for this mutation:
Here’s what we check in the test. First, we describe the mutation. Then we check two cases: success and fail. Each will follow a specific response schema:
The matcher will look like this:
To pass our tests, we first need to describe the GraphQL object type User:
Every field here has its type. For example, it can be an Object type (like User) or a Scalar type. In the description of this object, we use two built-in Scalar types (ID and String) and one custom Scalar type (Lib::Scalars::DateTime):
Now we’ll proceed directly to describing the mutation that will process the request to create a user.
When we name mutations, we usually use an object + verb construction. The main idea of this approach is that GraphQL sorts mutation fields by name. This way, we’re grouping queries by entities. Also, this approach is used by Shopify.
All mutations will be called from the root mutation. So add the mutation userCreate to the root mutation:
It’s good practice to wrap arguments of mutation queries into an input object. As you can see, in the test for our mutation query we’ve wrapped the arguments in input. There are two ways to wrap arguments:
- Inherit a class from GraphQL::Schema::RelayClassicMutation that automatically wraps all arguments in input objects.
- Manually create an input object with the necessary arguments (you can find detailed information about how to create an input object in the official documentation for the gem).
We chose the first option and will use it here and in all mutations below. Here’s how this mutation looks:
Our mutation consists of a name, a description, a description of arguments that the mutation takes, a description of fields that the mutation can return, and a method resolve that will return data for the described fields.
In the method resolve, we call our operation. Depending on the result, it returns either the created user or errors. The errors field returns an array of graphql objects of type Objects::Error:
In order to convert the errors that our operation returns to the format appropriate for Objects::Error, we use this service:
2.2. Show user feature
2.2.1. Implement the operation
Let’s start with writing a test for the Users::Show operation:
The operation looks like this:
The operation looks like this:
2.2.2. Implement a GraphQL query
Now let’s write tests for our graphql query:
As in the case of the userCreate mutation, we test two cases: failure (when the user isn’t found) and success (when the user is found). Each case will have its own response schema:
The call to our query will be made from QueryType:
The resolver for the query looks like this:
In the code above, we can see:
- The type that the query returns
- The argument that the query expects
- The resolve method, which starts our operation and returns the found instance of the User class in case of success.
2.2.3. Implement a handler for an ActiveRecord::RecordNotFound exception
If a user isn’t found when the operation Users::Show is run, an ActiveRecord::RecordNotFound exception will be raised. We need to handle this exception. Let’s create a handler and include it in ApplicationSchema:
Now we can handle the ActiveRecord::RecordNotFound exception and our tests will run successfully.
2.3. User authentication feature
We need to add user authentication to prevent user data from overlapping. We’ll use the JWT gem for this.
Add the ruby-jwt gem:
2.3.1. Implement a GraphQL query
Let’s start with tests. We’ll name a query that’s responsible for displaying data on the user identified as “me”:
Schemas for two cases will look as follows:
In our test, we use the sign_in helper, which generates a token and puts it into the request header:
2.3.2. Implement authentication
Authentication will be handled at the controller level. We put authentication logic in the module:
After that, we need to include the module in ApplicationController:
Create an AuthenticationController where the authentication logic will be called:
Our GraphqlsController should be inherited from AuthenticationController:
To use current_user in GraphQL, we need to change our Graphql::Execute operation:
Let’s wrap the call of our operations inside resolvers with method run (similar to the run method in Trailblazer::Rails::Controller). For that, we’ll create Lib::Mutations::Base and Lib::Resolvers::Base:
Now the userCreate mutation and the user query will look like this:
We decided to implement an authentication check in the method ‘ready?’, which is available in mutations and queries and runs before the ‘resolve’ method:
An exception looks like this:
We’ll add a handler for Exceptions::AuthenticationError to our ErrorHandler:
Now it’s time to work with query `me`. We need to declare it in the root query:
The resolver code is simple:
As a result of the query, we receive our instance of the User class that was authenticated.
2.4. Login feature
2.4.1. Implement the operation
Let’s start with tests for the login operation:
Now we’ll describe our operation and contract:
2.4.2. Implement GraphQL mutation
Tests for the mutation will look like this:
As a result of this mutation, we can get three different response schemas:
We’ll declare our mutation in the root mutation:
And describe it:
If the correct username and password are entered, the result of this mutation will be our user and token for authentication. Otherwise, an exception will be raised.
In this part of our tutorial, we’ve learned how to configure Trailblazer and GraphQl. We also implemented such user features as signup, show user, user authentication, and login feature.
Check out the second part of this tutorial to learn how to implement the main features of the ToDo list and authorization feature.
Feel free to start a conversation below if you have any questions and subscribe to our blog to learn with us!


